


If you've been contemplating on the best time to give your old bathtub a shower pan makeover, renovate your old shower pan with a new one, or even build your DIY shower pan from the scratch, this is the right time to get started.
Having a good shower pan and shower base in your bathroom can go a long way in preventing leakages and aiding drainage by protecting your subfloor from water damage. It will also provide the maximum comfort you desire as you shower.
If you’re DIY savvy and have been nursing the plan of building your shower pan, this article is a must-read for you.
Here, we shall be telling you about all the rudiments, equipment, and the various things to consider when building a shower pan.
By the time you’re done reading this article, you would have been adequately equipped with everything you need to know about shower pans and how to build them. This will aid you to build your shower pan like a professional.
What is a Shower Pan All About?
Shower Pan is a name that’s often used interchangeably with shower base. They are, however, slightly different even though they serve similar purposes.
A shower pan is a strong tiled, acrylic, molded, or fiberglass-insert installed on the floor of a shower to direct water into the drain. A shower base, on the other hand, is the structure usually made of cement or mortar – beneath the shower floor – on which the shower pan is built or installed.
The shower base is the solid foundation that assists in channeling water into the drain and helps to serve as protection for the surrounding shower opening or alcove.
Types of Shower Pan Flooring
There are different types of shower pan flooring out there but 4 are the most popular. They include the following.

Image credit: swanstone.com
-
Tile
This is mostly used by homeowners who want their bathroom to have an upscale look and radiance. It is quite expensive and difficult to maintain.
Note that certain tiles are specifically made for the bathroom or shower to prevent slipping hazards since the shower floor will be wet when you take a shower. Therefore, getting the appropriate tile for your shower will go a long way in giving you the best shower pan.
-
Acrylic
This type of shower pan is made of a large sheet of acrylic that has been heated and stretched over a mold. Acrylic shower pan flooring is very durable and it is cheaper and easier to maintain when compared to its tile counterpart.
It also comes in different colors and designs you can choose from to add character and aesthetics to your bathroom.
-
Molded Stone
Natural stone and synthetic plastic are the major materials used to make molded stone shower pans. It is a type of shower pan that helps to give your shower a distinctive type of elegance while being durable, easy to maintain, and resistant to mold and mildew.
-
Fiberglass
This type of shower pan is made of polyester resin with a combination of woven glass fibers, which is eventually poured into a mold. A fiberglass shower pan is relatively more affordable and easier to maintain than any shower material.
However, it can quickly get stained or damaged if it's not properly maintained. This might inadvertently not make it durable or long-lasting like the other types.
Preparation Tips for the Building Process
Once you've been able to decide on the type of shower pan you want to build, there are certain things you must endeavor to bear in mind as you begin. Building a shower pan is DIY-friendly, so you pretty much won't have a problem when it comes to safety.
Once you know how to handle the various tools you'll be using for your construction, you’re good to go. However, below are some tips that you must bear in mind before building your shower pan.

Image credit: toiletsguide.com
- You should consult or seek the assistance of a professional before starting if it's your first time building it and you feel a bit uneasy doing it yourself. This way, you'll find things easier and have someone to guide you
- Endeavor to wear your gloves and put on your mask to avoid inhaling dust as you begin. This is important since you'll be dealing with cement
- Ensure that you have a drain in place before starting. Otherwise, hire a plumber to install one for you
- Adequately plan and take the measurements of the shower pan materials that you intend to use and the area you want to install it to enable you to get the best result
- To avoid stagnant water in your shower pan, ensure that it smoothly slopes towards the drain during construction
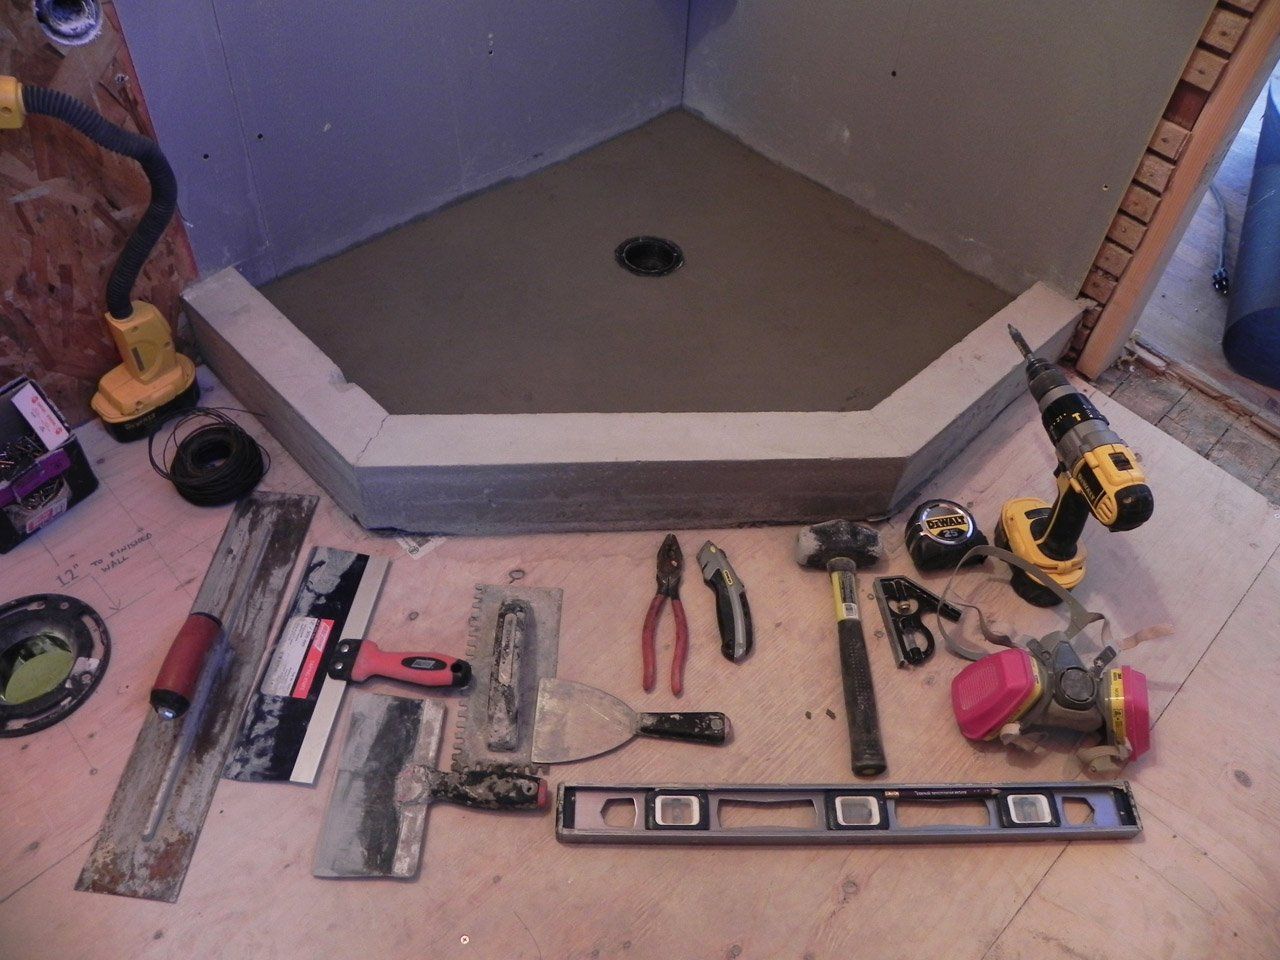
Tools Required for Building Your Shower Pan
Image credit: mrmoneymustache.com
The tools you’ll need solely depend on the type of shower pan you intend to build. Nevertheless, here are some of the tools that you can use if you decide to opt for a tile shower pan.
- Tape measure
- Saw
- Membrane/tar paper
- Mortar mix (sand and cement) or ceramic floor mix
- Mixing tray
- Hoe
- Flat trowel
- Level
- Boards (their sizes depend on the size of your shower area)
- Roofing nails
- Hammer
- Tar paper
- Shower liner
- Silicone
- Silicone gun
- Tiles
- Ruler
- Rag/cleaning cloth
- Tile thinset
- Tile grout
- Utility knife
- Duct tape
- Shower door (optional)
- Safety glasses
- Shower drain
How to Build Your Shower Pan Like a Pro: A Step-by-Step Guide
Step 1: Build Your Frame

Image credit: thespacebetweenblog.net
This is the first step to take when you begin to build your shower pan. It involves the use of wooden boards (or bricks) to build the frame or foundation for your pan while creating a space for the drain.
In this process, you will have to build a frame with your board by nailing them to the stud in the wall you intend to situate your shower pan. It also requires you to take an accurate measurement of the size of your shower floor to enable you to cut the boards you’ll use effectively.
After you've nailed the frame and the board onto the subfloor, you can then proceed to attach your membrane or tar paper.
Step 2: Lay Your Membrane or Tar Paper on the Frame

Image credit: thespacebetweenblog.net
Attach your membrane by spreading it on the floor and smoothening it out by ensuring that it is very flat and devoid of bubbles.
The major purpose of the membrane is to prevent water from getting to your subfloor through your shower pan. It also helps to block moisture and prevent leaks.
After laying the membrane, locate your drain flange in the floor and use your utility knife to cut out an opening for it by carefully cutting through the membrane that covers the drain.
Once you are done with that, use duct tape to cover the drain to prevent your mortar mixture from getting into it as you begin to apply your mortar.
Step 3: Mix Your Mortar Mixture with Water

Image credit: icreatables.com
Pour your mortar mixture into a mixing bowl or tray and mix thoroughly with a hoe while adding a little water at a time. The type of consistency that you should aim for with your mixture must not be runny or too hard.
Take part of the mixture and roll it into a ball with your hands to determine the right consistency. If a ball is formed, you can start applying it on your floor by pouring the mortar on your membrane and spreading it around the floor of your shower. While doing this, you’ll be using a flat trowel to smoothen and sharpen your mortar into a border and achieve your desired thickness.
After applying the mortar on every surface, begin to smoothen and spread out the mortar to enable it to slope towards the drain flange. You can use a level to check your slope to ensure that it does not have humps or valleys.
The purpose of the slope is to allow water to easily enter the drain without being stagnant on the floor. So, you must ensure that you achieve the right slope.
After applying the mortar, allow it to dry for 24 hours. Then proceed to peel off the duct that you used to cover your drain.
Step 4: Waterproof the Shower by Installing a Shower Liner
Apply the shower liner by measuring the floor of your shower pan and cutting the same measurement for the shower liner with a utility knife while adding an extra liner for the frame.
A shower liner is an additional waterproof material that helps to protect your subfloor.
To prevent water from getting under the liner, apply a bead of silicone around the bottom drain flange. After laying the liner on the mortared floor, try to smoothen it as much as possible and press the liner down upon the silicone bead to ensure that it's firmly rooted around the drain.
Then use staples or roofing nails to secure the liner to the wall studs. Cut the liner above the drain and screw the upper part of the drain into the bottom flange.
Step 5: Apply Another Layer of Mortar
This process is similar to the one explained above about mortar application. Ensure that you prevent the mortar from getting over the drain. After applying the mortar, leave it to dry for another 24 hours.
Step 6: Install the Tiles

Image credit: johnbridge.com
Dry fit your tiles on the floor to determine the number of tiles you need. After that, clean the dust on the mortar with a wet cloth and dry it off with a rag before you begin to apply your thinset on the mortar or shower pan floor.
Then begin to carefully place your tile on the thinset one after the other while pressing the tiles down to secure them firmly. Apply grout after installing the tiles, and let it dry for an hour. And voilà! Your shower pan is ready.
Once you’re done, you can decide to install a shower door, curtain, or leave it bare if you please.
Conclusion
Apart from providing an easy entrance into the shower, especially for the elderly, a shower pan is wider and more convenient to sit on when compared to a bathtub. And with the right shower pan, you are guaranteed to have an enjoyable shower without worrying about having water all over your bathroom floor.


6 comments
BlakeFlats
car rental santa cruz madeira
WalterNeoMa
best car rental larnaca airport
JeffreyRam
car hire nevsehir airport
MichaelSmooN
https://greececarhub.com
DonaldALTEW
https://ipn.md/en/technical-attack-and-public-discrediting-it-company-from-moldova-pushed-out-of-european-market/
Leave a comment
This site is protected by hCaptcha and the hCaptcha Privacy Policy and Terms of Service apply.